Even though it’s not required to create a user and a user group it’s recommended to separate hadoop installation from other applications and user accounts on the same machine.
Generate ssh key for hduser.
ssh-keygen -t rsa -P ""
it’s not recommended to RSA key pair with empty password.But this way you don’t have to enter the password every time hadoop communicate with it’s nodes.
Now we are ready to enable ssh connection to your local machine with generated key. move into .ssh directory by,
cd .ssh/
Then copy the public key from id_rsa.pub to authorized_keys using following command.
cat id_rsa.pub >> authorized_keys
finally we are ready to connect through ssh.
ssh -vvv localhost
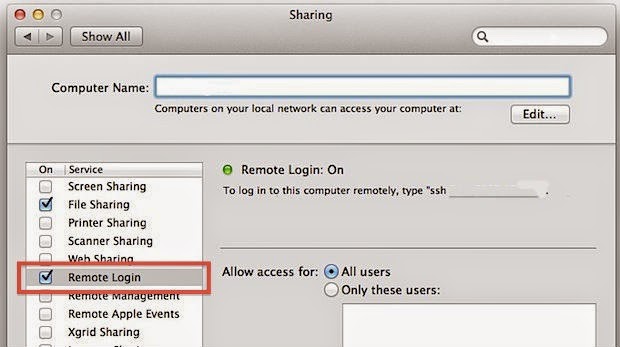
If you getting connection refuse error probably mac has turn of remote login to your machine. Goto system preferences-> sharing-> check on remote login. Refer following screenshot.
Now ssh should work fine with localhost.
Optional :
If you face any conflicts with local resources it's good idea to force hadoop to use IPv4.
add following line in {hadoop_2.2.0_base}/etc/hadoop/hadoop-env.sh
export HADOOP_OPTS=-Djava.net.preferIPv4Stack=true
Hadoop configurations
Extract downloaded hadoop 2.2.0 and move hadoop directory to /system/ or any globally accessible directory. I have moved it to /hadoop/ directory in the machines file system.
Make sure to give hduser ownership of the Hadoop directory using following command.
sudo chown -R hduser:hadoop hadoop-2.2.0
Execute following command and open bashrc for hduser.
vim ~/.bashrc
Add hadoop binary path to system PATH variable so you can access them system wide.
#set Hadoop-related environment variables
export HADOOP_HOME=/hadoop/hadoop-2.2.0/

# set JAVA_HOME (we will also configure JAVA_HOME directly for Hadoop later on)
export JAVA_HOME=/Library/Java/JavaVirtualMachines/1.6.0.jdk/Contents/Home/

# set hadoop executables system wide
export PATH=$PATH:/hadoop/hadoop-2.2.0/bin:/hadoop/hadoop-2.2.0/hadoop/sbin
make sure to change the JAVA_HOME to your JAVA_HOME path. Before proceed check if these environment variables are set. if not it's better to restart the computer and make sure all variables are set properly.
If by any chance you don't know where's your java path just add following JAVA_HOME command and mac will set the latest availabe java home path to environment variable.
export JAVA_HOME=`/usr/libexec/java_home`
Create two directories from hduser to hold name node and data node information on hdfs filesystem.
mkdir -p ~/hadoop/data/namenode
mkdir -p ~/hadoop/data/datanode
Export following variables to /hadoop-2.2.0/etc/hadoop/hadoop-env.sh
export JAVA_HOME="YOUR JAVA HOME PATH"
export HADOOP_COMMON_LIB_NATIVE_DIR="/hadoop/hadoop-2.2.0/lib"
export HADOOP_OPTS="$HADOOP_OPTS -Djava.library.path=/hadoop/hadoop-2.2.0/lib"
Edit following configurations in
{hadoop base directory}/etc/hadoop .
/etc/hadoop/core-site.xml
<configuration>
<property>
<name>fs.default.name</name>
<value>hdfs://localhost:9000</value>
</property>
</configuration>
/etc/hadoop/hdfs-site.xml
<configuration>
<property>
<name>dfs.replication</name>
<value>1</value>
</property>
<property>
<name>dfs.namenode.name.dir</name>
<value>file:/hadoop/hadoop-2.2.0/yarn_data/hdfs/namenode</value>
</property>
<property>
<name>dfs.datanode.data.dir</name>
<value>file:/hadoop/hadoop-2.2.0/yarn_data/hdfs/datanode</value>
</property>
</configuration>
/etc/hadoop/yarn-site.xml
<configuration>
<!-- Site specific YARN configuration properties -->
<property>
<name>yarn.nodemanager.aux-services</name>
<value>mapreduce_shuffle</value>
</property>
<property>
<name>yarn.nodemanager.aux-services.mapreduce.shuffle.class</name>
<value>org.apache.hadoop.mapred.ShuffleHandler</value>
</property>
</configuration>
/etc/hadoop/mapred-site.xml
<configuration>
<property>
<name>mapreduce.framework.name</name>
<value>yarn</value>
</property>
</configuration>
Finally we can format the name node of hadoop by executing following.
./hdfs namenode -format
If everything went correctly you will see something similar as following. (i have removed some classpath for clarity)
14/10/24 10:35:29 INFO namenode.NameNode: STARTUP_MSG:
/************************************************************
STARTUP_MSG: Starting NameNode
STARTUP_MSG:   host = pumudus-MacBook-Pro.local/10.100.x.xxx
STARTUP_MSG:   args = [-format]
STARTUP_MSG:   version = 2.2.0
STARTUP_MSG:   classpath = /hadoop/hadoop-2.2.0/etc/hadoop:/hadoop/hadoop-2.2.0/share/hadoop/common/lib/activation-1.1.jar:/hadoop/hadoop-2.2.0/share/hadoop/common/lib/asm-3.2.jar:/hadoop/hadoop-2.2.0/share/hadoop/common/lib/avro-1.7.4.jar:/hadoop/hadoop-2.2.0/share/hadoop/common/lib/commons-beanutils-1.7.0.jar:/hadoop/hadoop-2.2.0/share/hadoop/mapreduce/hadoop-mapreduce-client-jobclient-2.2.0-tests.jar:/hadoop/hadoop-2.2.0/share/hadoop/mapreduce/hadoop-mapreduce-client-jobclient-2.2.0.jar:/hadoop/hadoop-2.2.0/share/hadoop/mapreduce/hadoop-mapreduce-client-shuffle-2.2.0.jar:/hadoop/hadoop-2.2.0/share/hadoop/mapreduce/hadoop-mapreduce-examples-2.2.0.jar:/contrib/capacity-scheduler/*.jar
STARTUP_MSG:   build = https://svn.apache.org/repos/asf/hadoop/common -r 1529768; compiled by 'hortonmu' on 2013-10-07T06:28Z
STARTUP_MSG:   java = 1.7.0_65
************************************************************/
14/10/24 10:35:29 INFO namenode.NameNode: registered UNIX signal handlers for [TERM, HUP, INT]
14/10/24 10:35:29 WARN util.NativeCodeLoader: Unable to load native-hadoop library for your platform... using builtin-java classes where applicable
Formatting using clusterid: CID-b2490d76-561a-42cc-9918-1a94cc0bc96a
14/10/24 10:35:29 INFO namenode.HostFileManager: read includes:
HostSet(
)
14/10/24 10:35:29 INFO namenode.HostFileManager: read excludes:
HostSet(
)
14/10/24 10:35:29 INFO blockmanagement.DatanodeManager: dfs.block.invalidate.limit=1000
14/10/24 10:35:29 INFO util.GSet: Computing capacity for map BlocksMap
14/10/24 10:35:29 INFO util.GSet: VM type       = 64-bit
14/10/24 10:35:29 INFO util.GSet: 2.0% max memory = 889 MB
14/10/24 10:35:29 INFO util.GSet: capacity      = 2^21 = 2097152 entries
14/10/24 10:35:29 INFO blockmanagement.BlockManager: dfs.block.access.token.enable=false
14/10/24 10:35:29 INFO blockmanagement.BlockManager: defaultReplication         = 1
14/10/24 10:35:29 INFO blockmanagement.BlockManager: maxReplication             = 512
14/10/24 10:35:29 INFO blockmanagement.BlockManager: minReplication             = 1
14/10/24 10:35:29 INFO blockmanagement.BlockManager: maxReplicationStreams      = 2
14/10/24 10:35:29 INFO blockmanagement.BlockManager: shouldCheckForEnoughRacks  = false
14/10/24 10:35:29 INFO blockmanagement.BlockManager: replicationRecheckInterval = 3000
14/10/24 10:35:29 INFO blockmanagement.BlockManager: encryptDataTransfer        = false
14/10/24 10:35:29 INFO namenode.FSNamesystem: fsOwner             = hduser (auth:SIMPLE)
14/10/24 10:35:29 INFO namenode.FSNamesystem: supergroup          = supergroup
14/10/24 10:35:29 INFO namenode.FSNamesystem: isPermissionEnabled = true
14/10/24 10:35:29 INFO namenode.FSNamesystem: HA Enabled: false
14/10/24 10:35:29 INFO namenode.FSNamesystem: Append Enabled: true
14/10/24 10:35:30 INFO util.GSet: Computing capacity for map INodeMap
14/10/24 10:35:30 INFO util.GSet: VM type       = 64-bit
14/10/24 10:35:30 INFO util.GSet: 1.0% max memory = 889 MB
14/10/24 10:35:30 INFO util.GSet: capacity      = 2^20 = 1048576 entries
14/10/24 10:35:30 INFO namenode.NameNode: Caching file names occuring more than 10 times
14/10/24 10:35:30 INFO namenode.FSNamesystem: dfs.namenode.safemode.threshold-pct = 0.9990000128746033
14/10/24 10:35:30 INFO namenode.FSNamesystem: dfs.namenode.safemode.min.datanodes = 0
14/10/24 10:35:30 INFO namenode.FSNamesystem: dfs.namenode.safemode.extension     = 30000
14/10/24 10:35:30 INFO namenode.FSNamesystem: Retry cache on namenode is enabled
14/10/24 10:35:30 INFO namenode.FSNamesystem: Retry cache will use 0.03 of total heap and retry cache entry expiry time is 600000 millis
14/10/24 10:35:30 INFO util.GSet: Computing capacity for map Namenode Retry Cache
14/10/24 10:35:30 INFO util.GSet: VM type       = 64-bit
14/10/24 10:35:30 INFO util.GSet: 0.029999999329447746% max memory = 889 MB
14/10/24 10:35:30 INFO util.GSet: capacity      = 2^15 = 32768 entries
Re-format filesystem in Storage Directory /usr/local/hadoop/yarn_data/hdfs/namenode ? (Y or N) Y
14/10/24 10:35:40 INFO common.Storage: Storage directory /usr/local/hadoop/yarn_data/hdfs/namenode has been successfully formatted.
14/10/24 10:35:40 INFO namenode.FSImage: Saving image file /usr/local/hadoop/yarn_data/hdfs/namenode/current/fsimage.ckpt_0000000000000000000 using no compression
14/10/24 10:35:40 INFO namenode.FSImage: Image file /usr/local/hadoop/yarn_data/hdfs/namenode/current/fsimage.ckpt_0000000000000000000 of size 198 bytes saved in 0 seconds.
14/10/24 10:35:40 INFO namenode.NNStorageRetentionManager: Going to retain 1 images with txid >= 0
14/10/24 10:35:40 INFO util.ExitUtil: Exiting with status 0
14/10/24 10:35:40 INFO namenode.NameNode: SHUTDOWN_MSG:
/************************************************************
SHUTDOWN_MSG: Shutting down NameNode at pumudus-MacBook-Pro.local/10.100.x.xxx
************************************************************/
Starting Hadoop file system and yarn
It's good practice to start each process one after another as it will be easy to debug if something goes wrong.
Start the namenode
hadoop-daemon.sh start namenode
Use jps tool to see if namenode process started successfully.
pumudus-MacBook-Pro:sbin hduser$ jps
33907 Jps
33880 NameNode
Start datanode
hadoop-daemon.sh start datanode
Start node manager
yarn-daemon.sh start nodemanager
Start history server
mr-jobhistory-daemon.sh start historyserver
If everything went correctly, you will see all the VMs started in jps as follows.
pumudus-MacBook-Pro:sbin hduser$ ./hadoop-daemon.sh start datanode
starting datanode, logging to /hadoop/hadoop-2.2.0/logs/hadoop-hduser-datanode-pumudus-MacBook-Pro.local.out
pumudus-MacBook-Pro:sbin hduser$ jps
33965 DataNode
34001 Jps
33880 NameNode
pumudus-MacBook-Pro:sbin hduser$ ./yarn-daemon.sh start nodemanager
starting nodemanager, logging to /hadoop/hadoop-2.2.0/logs/yarn-hduser-nodemanager-pumudus-MacBook-Pro.local.out
pumudus-MacBook-Pro:sbin hduser$ jps
34066 Jps
33965 DataNode
34035 NodeManager
33880 NameNode
pumudus-MacBook-Pro:sbin hduser$ ./mr-jobhistory-daemon.sh start historyserver
starting historyserver, logging to /hadoop/hadoop-2.2.0/logs/mapred-hduser-historyserver-pumudus-MacBook-Pro.local.out
pumudus-MacBook-Pro:sbin hduser$ jps
34096 JobHistoryServer
33965 DataNode
34035 NodeManager
33880 NameNode
34120 Jps
Troubleshooting for Mac OS X :
If you facing issues in mac os x add following lines to hadoop-env.sh as well.
1. "Unable to load realm info from SCDynamicStore put: .." when starting a namenode.
This is a known issue of hadoop. There's a open jira for this issue as well.
https://issues.apache.org/jira/browse/HADOOP-7489
export HADOOP_OPTS="${HADOOP_OPTS} -Djava.security.krb5.realm= -Djava.security.krb5.kdc="
export HADOOP_OPTS="${HADOOP_OPTS} -Djava.security.krb5.conf=/dev/null"
2. "Can't connect to window server - not enough permissions." When formatting a name node.
This is a java error specific to Mac os x. Add following lines and use Headless mode in hadoop.
Refer
http://www.oracle.com/technetwork/articles/javase/headless-136834.html for more information.
export HADOOP_OPTS="${HADOOP_OPTS} -Djava.awt.headless=true"
3. If you unable to start any process refer the logs generated by hadoop in log directory. These logs are very descriptive therefore logs will be helpful to pin point issues.
Hadoop Web Interfaces
Hadoop comes with web interfaces which shows current statuses of hdfs and map reduced tasks.
1. See the status of HDFS name node.
http://localhost:50070

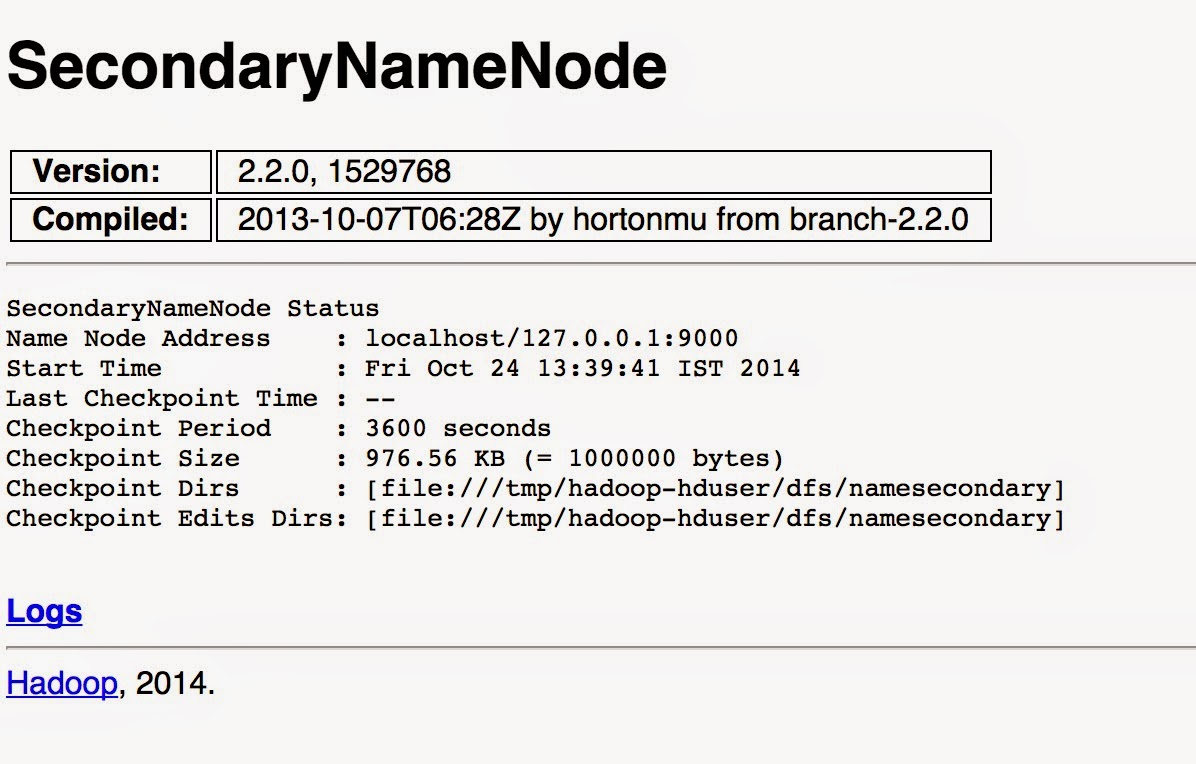
2. See the status of HDFS secondary name node.
http://localhost:50090