Thursday, April 14, 2016

Setup Oracle sql plus client on AWS Ubuntu/Linux


AWS is all about automating and command line. Therefore it's necessary access databases through terminal in many use-cases specially when dealing with AWS instances. For example, there can be a scenario where several complicated sql scripts need to be run on oracle database periodically during AWS test cycles. SQL Developer is not the ideal tool for this due to occasional hangs and unpredictability. But oracle has a great command line client ideal for these type of scenarios.

Dependencies :

AWS Instance with Ubuntu/Linux
Even this has setup on AWS instance, AWS instances are not required. These steps will be sufficient to install oracle sql instant client on any ubuntu/linux instance in foreseeable future.

Oracle Instant Client package
Oracle instant client package (Basic or lite). These packages are available on instant client downloads for Linux x86-64[1]. I'll be using  "oracle-instantclient11.2-basic-11.2.0.3.0-1.x86_64.rpm" for this setup. But there won't be  any different for lite version if you only need to run basic sql queries through the client.

Oracle SQL Plus package
Download SQL Plus package from oracle client download site[1]. This package contains additional libraries and executable for running SQL Plus with Instant Client. Make sure it's compatible to client package(same version eg: 11.2.0.3.0-1) "oracle-instantclient11.2-sqlplus-11.2.0.3.0-1.x86_64.rpm" It's hard to mess this up as oracle clearly tabulated all the downloads[1] for each oracle version in their site.

Important : Make sure client packages are compatible with the version of the database instance. Otherwise client won't execute as expected. In this setup i'll be working with oracle 11g (11.2.0.3.0) instance. Following steps should work for any oracle database version in foreseeable future.


Steps to Install the Client : 


1. Install alien package
sudo apt-get install alien


2. Install downloaded instant client rpm package
sudo alien -i oracle-instantclient11.2-basic-11.2.0.3.0-1.x86_64.rpm


3. Install downloaded sql plus package
sudo alien -i oracle-instantclient11.2-sqlplus-11.2.0.3.0-1.x86_64.rpm


4. Install libaio1,libaio-dev packages if not already installed. Usually in vanilla ubuntu 14 libaio1, libaio-dev packages are not pre-installed. These packages required to start oracle instant client.
sudo apt-get install libaio1 libaio-dev


5. Export oracle client lib directory path to LD_LIBRARY_PATH variable. Make sure to check the path in your system based on your versions before export.
export LD_LIBRARY_PATH=/usr/lib/oracle/11.2/client64/lib/${LD_LIBRARY_PATH:+:$LD_LIBRARY_PATH}


6. Test the client.
Since i have set this up on a 64bit vm (all the aws instances are now 64bit) i'll be using "sqlplus64" if by any chance you are on 32bit vm replace  "sqlplus64" with "sqlplus".
Make sure to replace "username", "password", "rds_hostname". change the port if you have change the default port on oracle database instance.
Important : Change the "ORCL" to "XE" in connection url if you are using a oracle express edition as it's default SID is "XE".

sqlplus64 username/password@//rds_hostname:1521/ORCL

Following sql prompt will appear if your credentials are correct.

ubuntu@ip-272-300-203-1317:~/oracle_client$ sqlplus64 username/password@//rds_hostname:1521/ORCL

SQL*Plus: Release 11.2.0.3.0 Production on Thu Apr 14 07:43:55 2016

Copyright (c) 1982, 2011, Oracle.  All rights reserved.


Connected to:
Oracle Database 11g Enterprise Edition Release 11.2.0.4.0 - 64bit Production
With the Partitioning, Oracle Label Security, OLAP, Data Mining
and Real Application Testing options

SQL>


Now it's a matter of querying the database as your user permission permits.

Good Luck..!!


[1] http://www.oracle.com/technetwork/topics/linuxx86-64soft-092277.html

Thursday, August 27, 2015

MQTT retain message flow in WSO2 MB


This article will explain basics of retain feature as it's defined in MQTT 3.1specification[1], Simple use case of retain feature and high level architecture of how MQTT retain messages handled in WSO2 message broker 3.0.0[2].

What is MQTT retain ?


MQTT retain is a method to keep certain messages (retain flagged) within broker so future subscribers for same topic can receive these messages. According to MQTT 3.1 specification[1] following are the main attributes of retain feature in MQTT.

  • Publishing client decides if a particular message should kept in broker for future subscribers. (set retain flag upon publishing the message)
  • When a new subscriber subscribed for given topic if there is a retained message for that topic it should be delivered to subscriber upon subscription.
  • Retain message should remove from broker if an empty payload received for a given topic with retain flag set to true.

All retain messages will honor QOS and other basic MQTT rules defined in specification[1].


Simple use-case for MQTT retain


MQTT is a light weight messaging protocol which mainly focused on IoT (Internet of things) developments. There can be instances where network connections or even sensors itself not available in practical scenarios. By using MQTT retain feature it's possible to keep a last known good value for future subscribers upon subscribing.

For example, Smart temperature monitor can check if the temperature outside operational range and send warnings with retain flag enabled (temporary warning message). Any newly joined equipment (subscriber) can take precautions to handle the situation even if the  temperature monitor is offline/ broken at the time of subscribing since it'll receive the retained warning message.

Once parameters are within desired range it can remove the retain enabled message from broker (Remove the warning) by sending empty payload message with retain enabled. This will remove the retain message and future subscribers won't receive it.


High level architecture of MQTT retain implementation in WSO2 MB 3.0.0


There are two paths in retain feature.  Namely there are as follows.
  • Retain Publish Path (Message flow path when MQTT message received with retain flag set by the broker)
  • Retain Delivery Path (Message flow path where retain message delivered to MQTT topic subscriber upon subscription)

Retain Publish Path


Following diagram shows start to end message flow path when a retain message hit on broker. 


Retain Publish Path

When a MQTT message received to the broker retain state will pass through disruptor before processing it.

In PersistenceStoreConnector MQTT message metadata will be converted to andes message metadata and retain state will be preserved in andes metadata for further processing.

Inside disruptor, onUpdateEvent retain message will put to the event list. Message writer will write to data stores once message writer event triggered.

After onUpdateEvent triggered messageWriter Event will be triggered. This event will call MessagingEngine to write retained messages to datasource.

MessagingEngine will call store retain messages methods in MessageStore interface and call relevant data source implementation to store retain messages. Unlike normal MQTT/AMQP messages, retain messages will be stored on separate retain specific table on MB message store. (MB_RETAINED_CONTENT, MB_RETAINED_METADATA)


Retain Delivery Path


Following diagram shows start to end message delivery path when a subscriber subscribe to a topic and that particular topic has retained messages stored on broker side.


Retain Delivery Path


Retain delivery path triggers when a MQTT subscriber subscribed to a topic. On state change event updateState() in AndesInboundStateEvent will call handleOpenSubscriptionEvent().
OpenSubscriptionEvent() will check if subscription instance is a MQTT and if it's MQTT check for retained messages for subscribed topic.

Retained message metadata will be retrieved(if there's any) from messagingEngine by calling getRetainedMessageByTopic method. This method will check if there's any wildcard matches[1] for subscribed topic as well.

If there's any retained message metadata found for subscribed topic contents of that message will send to the subscriber directly.

This concludes life cycle of a retained message once subscriber receives the message.


References

[1] http://public.dhe.ibm.com/software/dw/webservices/ws-mqtt/MQTT_V3.1_Protocol_Specific.pdf
[2] http://wso2.com/products/message-broker/

Monday, January 19, 2015

WSO2 Carbon : Remote debug wso2 carbon components using Intellij Idea IDE


In this brief tutorial I'll explain how to remote debug a carbon component. Since all wso2 products are based on  carbon components, this simple tutorial will help you to debug any wso2 product.

Please note that first section explains how to install carbon component using p2 repository as a feature. You can skip first section if you have a component already installed.

Prerequisites :

WSO2 carbon binary [download] [1]
Sample carbon component [git repo] [2]
Intllij Idea IDE

Install Carbon Component

First we have to install carbon component to a carbon instance. This step is needed since we are going to remote debug installed component. If you have already installed/build the component you wants to debug skip this section and start with 'Remote Debugging'.

1. Download and extract wso2 carbon zip file.
Run wso2server.sh in {wso2_carbon_base}/wso2carbon-4.2.0/bin directory using CLI as follows.
sh wso2server.sh

If carbon instance successfully initiated it should promote a url for carbon console in CLI.
pumudus-MacBook-Pro:bin pumudu$ sh wso2server.sh
JAVA_HOME environment variable is set to /Library/Java/JavaVirtualMachines/1.6.0.jdk/Contents/Home
CARBON_HOME environment variable is set to /Users/pumudu/Documents/carbon/wso2carbon-4.2.0
[2015-01-19 13:28:03,617]  INFO {org.wso2.carbon.core.internal.CarbonCoreActivator} -  Starting WSO2 Carbon...
[2015-01-19 13:28:03,620]  INFO {org.wso2.carbon.core.internal.CarbonCoreActivator} -  Operating System : Mac OS X 10.9.4, x86_64
[2015-01-19 13:28:03,620]  INFO {org.wso2.carbon.core.internal.CarbonCoreActivator} -  Java Home        : /Library/Java/JavaVirtualMachines/1.6.0.jdk/Contents/Home
[2015-01-19 13:28:03,620]  INFO {org.wso2.carbon.core.internal.CarbonCoreActivator} -  Java Version     : 1.6.0_65
[2015-01-19 13:28:03,620]  INFO {org.wso2.carbon.core.internal.CarbonCoreActivator} -  Java VM          : Java HotSpot(TM) 64-Bit Server VM 20.65-b04-462,Apple Inc.
[2015-01-19 13:28:03,620]  INFO {org.wso2.carbon.core.internal.CarbonCoreActivator} -  Carbon Home      : /Users/pumudu/Documents/carbon/wso2carbon-4.2.0
[2015-01-19 13:28:03,621]  INFO {org.wso2.carbon.core.internal.CarbonCoreActivator} -  Java Temp Dir    : /Users/pumudu/Documents/carbon/wso2carbon-4.2.0/tmp
[2015-01-19 13:28:03,621]  INFO {org.wso2.carbon.core.internal.CarbonCoreActivator} -  User             : pumudu, en-US, Asia/Colombo
[2015-01-19 13:28:03,670]  WARN {org.wso2.carbon.core.bootup.validator.util.ValidationResultPrinter} -  The default keystore (wso2carbon.jks) is currently being used. To maximize security when deploying to a production environment, configure a new keystore with a unique password in the production server profile.
[2015-01-19 13:28:04,568]  INFO {org.wso2.carbon.registry.core.jdbc.EmbeddedRegistryService} -  Configured Registry in 50ms
[2015-01-19 13:28:04,660]  INFO {org.wso2.carbon.registry.core.internal.RegistryCoreServiceComponent} -  Registry Mode    : READ-WRITE
[2015-01-19 13:28:04,718]  INFO {org.wso2.carbon.user.core.internal.UserStoreMgtDSComponent} -  Carbon UserStoreMgtDSComponent activated successfully.
[2015-01-19 13:28:07,726]  INFO {org.apache.catalina.startup.TaglibUriRule} -  TLD skipped. URI: http://tiles.apache.org/tags-tiles is already defined
[2015-01-19 13:28:08,704]  INFO {org.wso2.carbon.core.deployment.DeploymentInterceptor} -  Deploying Axis2 service: echo {super-tenant}
[2015-01-19 13:28:08,872]  INFO {org.wso2.carbon.core.deployment.DeploymentInterceptor} -  Deploying Axis2 service: Version {super-tenant}
[2015-01-19 13:28:08,964]  INFO {org.wso2.carbon.core.deployment.DeploymentInterceptor} -  Deploying Axis2 service: echo {super-tenant}
[2015-01-19 13:28:09,022]  INFO {org.wso2.carbon.core.deployment.DeploymentInterceptor} -  Deploying Axis2 service: Version {super-tenant}
[2015-01-19 13:28:09,503]  INFO {org.wso2.carbon.core.init.CarbonServerManager} -  Repository       : /Users/pumudu/Documents/carbon/wso2carbon-4.2.0/repository/deployment/server/
[2015-01-19 13:28:09,518]  INFO {org.wso2.carbon.core.internal.permission.update.PermissionUpdater} -  Permission cache updated for tenant -1234
[2015-01-19 13:28:09,537]  INFO {org.wso2.carbon.core.transports.http.HttpsTransportListener} -  HTTPS port       : 9443
[2015-01-19 13:28:09,537]  INFO {org.wso2.carbon.core.transports.http.HttpTransportListener} -  HTTP port        : 9763
[2015-01-19 13:28:09,548]  INFO {org.apache.tomcat.util.net.NioSelectorPool} -  Using a shared selector for servlet write/read
[2015-01-19 13:28:09,669]  INFO {org.apache.tomcat.util.net.NioSelectorPool} -  Using a shared selector for servlet write/read
[2015-01-19 13:28:09,878]  INFO {org.wso2.carbon.core.init.JMXServerManager} -  JMX Service URL  : service:jmx:rmi://localhost:11111/jndi/rmi://localhost:9999/jmxrmi
[2015-01-19 13:28:09,879]  INFO {org.wso2.carbon.core.internal.StartupFinalizerServiceComponent} -  Server           :  WSO2 Carbon-4.2.0
[2015-01-19 13:28:09,879]  INFO {org.wso2.carbon.core.internal.StartupFinalizerServiceComponent} -  WSO2 Carbon started in 8 sec
[2015-01-19 13:28:10,004]  INFO {org.wso2.carbon.ui.internal.CarbonUIServiceComponent} -  Mgt Console URL  : https://10.106.3.125:9443/carbon/

2. Log into carbon management console using Mgt console URL : https://10.106.3.125:9443/carbon/
Default credentials username : admin Password : admin

3. From given simple carbon component git repository[2] get the source code of carbon component.

4. After logged into carbon management console goto
Configure -> Features -> Feature Management -> Repository Management -> Add Repository.
Then copy paste P-2 repository path from target directory.
{base_carbon_component}/order-manager/order-manager-repository/target/p2-repo/


5. Install "Order Manager Aggregate" carbon component using Available Features tab.


6. If everything went smoothly it'll ask you to restart the server. Using CLI or using web console restart the wso2 server.


7. Once restarted the server and logged into management console order management ui should appear  under main tab.


It's a very simple CRUD system. Feel free to add few entries and understand the functionality of this component. Now we can start debug this order management component using intellij IDE.

Remote Debugging


1. Start carbon server with debug enabled using following command.
sh wso2server.sh -debug 5005


2. Open carbon component project[2] using Intellij IDE. We'll debug addOrder and deleteOrder methods in back end. Similarly we can debug front end as well.
Add two break points in line number 49 and 79 in OrderService.java as follows.
order-manager/order-manager-components/org.wso2.carbon.order.mgt/src/main/java/org/wso2/carbon/order/mgt/OrderService.java 


3. Goto Run-> Debug.. It'll open debug dialog box. first select Remote and then click on plus sign on upper left corner.


4. Give appropriate name for debug session instead of "unnamed" and click on debug. Make sure Host is localhost and Port has set to 5005.

5. Once carbon server successfully boot up log in as admin in carbon management console and try to add a new order entry.


Click on resume program in debugger panel or press F9 to resume. Make sure you resume once you done with a break point before interacting with the management console again.

6. Similarly try to delete a record and it'll trigger the break point in line number 79.


This is how you can remote debug any carbon related product / component by intellij idea.
Happy debugging..!!! good luck..!!!


Reference :
[1] http://wso2.com/products/carbon/
[2] https://github.com/pumudu88/SimpleCarbonComponent


Monday, January 12, 2015

WSO2 Carbon : What's WSO2 Carbon ?


What's Carbon (The Definition)

WSO2 Carbon platform is the base framework for all WSO2 products and Cloud services. It's based on java OSGi(Open Service Gateway initiative) and it's 100% open source. WSO2 Carbon is lean, consistent, modular, componentized middleware platform for enterprise softwares. The Carbon platform consists of a powerful core set of components and numerous product-specific components that are plugged together to provide a unique set of products.

One of the main characteristic of carbon components is that they can be easily decoupled. Carbon components can be added or removed from any given carbon instance easily because of this decoupling characteristic.  


WSO2 carbon platform diagram

Why we need Carbon like platform ?

Following are some major advantages in carbon platform.
  • High scalability.
  • Easy to extend functionality.
  • Well defined approaches to create carbon components.
  • StratosLive consistent management and operations.
  • Adding new servers and functions smoothly without downtime.


Following are some features in Carbon platform
  • Manages the packaging of OSGi bundles into features.
  • Supports deploying, un-deploying, checkpoints.
  • Advanced features included shared repositories


Thursday, November 6, 2014

SonarQube : Using SonarQube with Maven and Mac OSX


SonarQube (formally known as just sonar) is a server based open source platform for inspecting code quality of a project. It's mainly designed to inspect continuous code quality of projects with multi developer environment. But it can be use to inspect code quality in individual projects as well.


In this short tutorial I'll explain how to use sonar in single developer environment to inspect code quality of a java project.

I have used following configurations to up and running SonarQube. 
Mac OS X (10.9.4)
Mysql 
Maven 3.0
JDK 1.6 or Above
Sonar 4.4.1


1. Download, Install and run SonarQube

It's open source..!! you can download it free from sonar website. 
SonarQube download [1]. Unzip somewhere you can reach.
Set the SONAR_HOME path to sonar qube base directory using .profile or .bashrc scripts.


2. Create Mysql database for SonarQube

Source following script on mysql to create new database for sonar sonar database script [2]. This is essential as it keeps all data related to projects on this database.

Make sure it's created properly by login to Mysql server.


3. Set up SonarQube

Goto sonarQube conf directory using "cd $SONAR_HOME"/conf and open sonar.properties file using vim.

# Permissions to create tables, indices and triggers must be granted to JDBC user.
# The schema must be created first.
sonar.jdbc.username=sonar
sonar.jdbc.password=sonar

#----- Embedded database H2
# Note: it does not accept connections from remote hosts, so the
# SonarQube server and the maven plugin must be executed on the same host.

# Comment the following line to deactivate the default embedded database.
sonar.jdbc.url=jdbc:h2:tcp://localhost:9092/sonar

# directory containing H2 database files. By default it's the /data directory in the SonarQube installation.
#sonar.embeddedDatabase.dataDir=
# H2 embedded database server listening port, defaults to 9092
#sonar.embeddedDatabase.port=9092


#----- MySQL 5.x
# Comment the embedded database and uncomment the following line to use MySQL
sonar.jdbc.url=jdbc:mysql://localhost:3306/sonar?useUnicode=true&characterEncoding=utf8&rewriteBatchedStatements=true

Note down sonar .jdbc username and password this is the username and password.
Uncomment sonar.jdbc.url to enable jdbc driver for mysql database.


4. Set up maven to run sonar upon build.

Move to .m2 directory using following command.
cd ~/.m2/

Create a new file settings.xml.
vim settings.xml 

Save following xml as settings.xml using vim.
<settings>
    <profiles>
        <profile>
            <id>sonar</id>
            <activation>
                <activeByDefault>true</activeByDefault>
            </activation>
            <properties>
                <!-- Example for MySQL-->
                <sonar.jdbc.url>
                  jdbc:mysql://localhost:3306/sonar?useUnicode=true&amp;characterEncoding=utf8
                </sonar.jdbc.url>
                <sonar.jdbc.username>root</sonar.jdbc.username>
                <sonar.jdbc.password>{your_mysql_root_password}</sonar.jdbc.password>
 
                <!-- Optional URL to server. Default value is http://localhost:9000 -->
                <sonar.host.url>
                  http://localhost:9000
                </sonar.host.url>
            </properties>
        </profile>
     </profiles>
</settings>
Change your mysql root username and password accordingly and add localhost to sonar.host.url.

5. Run sonar server.

Move to sonar bin directory.
cd $SONAR_HOME/bin/

Run the sonar sever as follows.
./macosx-universal-64/sonar.sh start

Now using a web browser goto following url http://localhost:9000/ . Hopefully now you should see the sonar dashboard.


6. Inspect a project using SonarQube.

From CLI move to root directory of your project (where the main pom file is) and run following command.
 mvn clean install sonar:sonar

After build success using a web browser open sonar dashboard and you will see your newly build project under "Projects" tab.


Congratulations.. now you can use sonar for inspect quality of your code every time you build it.


References :


Friday, October 24, 2014

Hadoop : Single Node Cluster On Mac OS X


Creating a single node cluster  proper way can be little challenging if you are new to hadoop and mac os. Hopefully following guide will be helpful to create a hadoop single node cluster on Mac OS X.

prerequisites :

  • Mac OS X 10.9.4 or higher
  • java 1.6
  • hadoop 2.2.0 or higher
Basic knowledge on terminal commands will definitely useful as well. :)

Create a separate user for hadoop


Even though it’s not required to create a user and a user group it’s recommended to separate hadoop installation from other applications and user accounts on the same machine.

  1. goto System preferences ->user and user groups
  2. unlock the window and create a group name 'hadoop'
  3. create a user name 'hduser'
  4. click on newly created hadoop group and select the hduser to add hduser to hadoop group.
This can be done in terminal but for some reason in mac os x linux commands didn't work for me.

SSH Configuration for hadoop


Hadoop need ssh to connect with it’s nodes. we need to configure ssh connection to localhost with hduser logged in.

ssh should be installed on your machine to proceed. There are plenty of tutorials out there how to install ssh on mac.


1. Generate ssh key for hduser

log in as hduser.
su - hduser

Generate ssh key for hduser.
ssh-keygen -t rsa -P ""
it’s not recommended to RSA key pair with empty password.But this way you don’t have to enter the password every time hadoop communicate with it’s nodes.

Now we are ready to enable ssh connection to your local machine with generated key. move into .ssh directory by,
cd .ssh/

Then copy the public key from id_rsa.pub to authorized_keys using following command.
cat id_rsa.pub >> authorized_keys

finally we are ready to connect through ssh.
ssh -vvv localhost

If you getting connection refuse error probably mac has turn of remote login to your machine. Goto system preferences-> sharing-> check on remote login. Refer following screenshot.
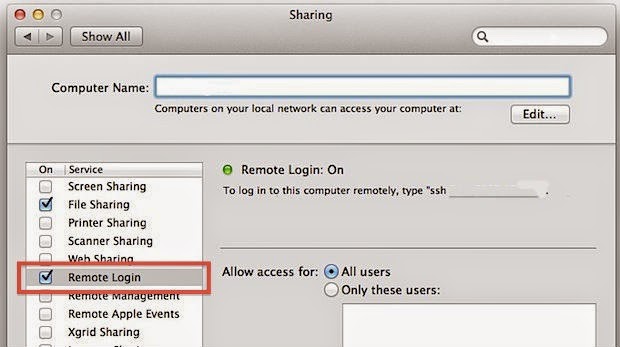


Now ssh should work fine with localhost.

Optional : 
If you face any conflicts with local resources it's good idea to force hadoop to use IPv4.
add following line in {hadoop_2.2.0_base}/etc/hadoop/hadoop-env.sh
export HADOOP_OPTS=-Djava.net.preferIPv4Stack=true


Hadoop configurations


Extract downloaded hadoop 2.2.0 and move hadoop directory to /system/ or any globally accessible directory. I have moved it to /hadoop/ directory in the machines file system.

Make sure to give hduser ownership of the Hadoop directory using following command.
sudo chown -R hduser:hadoop hadoop-2.2.0

Execute following command and open bashrc for hduser.
vim ~/.bashrc

Add hadoop binary path to system PATH variable so you can access them system wide.
#set Hadoop-related environment variables
export HADOOP_HOME=/hadoop/hadoop-2.2.0/

# set JAVA_HOME (we will also configure JAVA_HOME directly for Hadoop later on)
export JAVA_HOME=/Library/Java/JavaVirtualMachines/1.6.0.jdk/Contents/Home/

# set hadoop executables system wide
export PATH=$PATH:/hadoop/hadoop-2.2.0/bin:/hadoop/hadoop-2.2.0/hadoop/sbin

make sure to change the JAVA_HOME to your JAVA_HOME path. Before proceed check if these environment variables are set. if not it's better to restart the computer and make sure all variables are set properly.

If by any chance you don't know where's your java path just add following JAVA_HOME command and mac will set the latest availabe java home path to environment variable.
export JAVA_HOME=`/usr/libexec/java_home`

Create two directories from hduser to hold name node and data node information on hdfs filesystem.
mkdir -p ~/hadoop/data/namenode
mkdir -p ~/hadoop/data/datanode

Export following variables to /hadoop-2.2.0/etc/hadoop/hadoop-env.sh
export JAVA_HOME="YOUR JAVA HOME PATH"
export HADOOP_COMMON_LIB_NATIVE_DIR="/hadoop/hadoop-2.2.0/lib"
export HADOOP_OPTS="$HADOOP_OPTS -Djava.library.path=/hadoop/hadoop-2.2.0/lib"

Edit following configurations in {hadoop base directory}/etc/hadoop .

/etc/hadoop/core-site.xml
<configuration>
<property>
<name>fs.default.name</name>
<value>hdfs://localhost:9000</value>
</property>
</configuration>

/etc/hadoop/hdfs-site.xml 
<configuration>
<property>
<name>dfs.replication</name>
<value>1</value>
</property>
<property>
<name>dfs.namenode.name.dir</name>
<value>file:/hadoop/hadoop-2.2.0/yarn_data/hdfs/namenode</value>
</property>
<property>
<name>dfs.datanode.data.dir</name>
<value>file:/hadoop/hadoop-2.2.0/yarn_data/hdfs/datanode</value>
</property>
</configuration>

/etc/hadoop/yarn-site.xml
<configuration>
<!-- Site specific YARN configuration properties -->
<property>
<name>yarn.nodemanager.aux-services</name>
<value>mapreduce_shuffle</value>
</property>
<property>
<name>yarn.nodemanager.aux-services.mapreduce.shuffle.class</name>
<value>org.apache.hadoop.mapred.ShuffleHandler</value>
</property>
</configuration>

/etc/hadoop/mapred-site.xml
<configuration>
<property>
<name>mapreduce.framework.name</name>
<value>yarn</value>
</property>
</configuration>


Finally we can format the name node of hadoop by executing following.
./hdfs namenode -format

If everything went correctly you will see something similar as following. (i have removed some classpath for clarity)
14/10/24 10:35:29 INFO namenode.NameNode: STARTUP_MSG: 
/************************************************************
STARTUP_MSG: Starting NameNode
STARTUP_MSG:   host = pumudus-MacBook-Pro.local/10.100.x.xxx
STARTUP_MSG:   args = [-format]
STARTUP_MSG:   version = 2.2.0
STARTUP_MSG:   classpath = /hadoop/hadoop-2.2.0/etc/hadoop:/hadoop/hadoop-2.2.0/share/hadoop/common/lib/activation-1.1.jar:/hadoop/hadoop-2.2.0/share/hadoop/common/lib/asm-3.2.jar:/hadoop/hadoop-2.2.0/share/hadoop/common/lib/avro-1.7.4.jar:/hadoop/hadoop-2.2.0/share/hadoop/common/lib/commons-beanutils-1.7.0.jar:/hadoop/hadoop-2.2.0/share/hadoop/mapreduce/hadoop-mapreduce-client-jobclient-2.2.0-tests.jar:/hadoop/hadoop-2.2.0/share/hadoop/mapreduce/hadoop-mapreduce-client-jobclient-2.2.0.jar:/hadoop/hadoop-2.2.0/share/hadoop/mapreduce/hadoop-mapreduce-client-shuffle-2.2.0.jar:/hadoop/hadoop-2.2.0/share/hadoop/mapreduce/hadoop-mapreduce-examples-2.2.0.jar:/contrib/capacity-scheduler/*.jar
STARTUP_MSG:   build = https://svn.apache.org/repos/asf/hadoop/common -r 1529768; compiled by 'hortonmu' on 2013-10-07T06:28Z
STARTUP_MSG:   java = 1.7.0_65
************************************************************/
14/10/24 10:35:29 INFO namenode.NameNode: registered UNIX signal handlers for [TERM, HUP, INT]
14/10/24 10:35:29 WARN util.NativeCodeLoader: Unable to load native-hadoop library for your platform... using builtin-java classes where applicable
Formatting using clusterid: CID-b2490d76-561a-42cc-9918-1a94cc0bc96a
14/10/24 10:35:29 INFO namenode.HostFileManager: read includes:
HostSet(
)
14/10/24 10:35:29 INFO namenode.HostFileManager: read excludes:
HostSet(
)
14/10/24 10:35:29 INFO blockmanagement.DatanodeManager: dfs.block.invalidate.limit=1000
14/10/24 10:35:29 INFO util.GSet: Computing capacity for map BlocksMap
14/10/24 10:35:29 INFO util.GSet: VM type       = 64-bit
14/10/24 10:35:29 INFO util.GSet: 2.0% max memory = 889 MB
14/10/24 10:35:29 INFO util.GSet: capacity      = 2^21 = 2097152 entries
14/10/24 10:35:29 INFO blockmanagement.BlockManager: dfs.block.access.token.enable=false
14/10/24 10:35:29 INFO blockmanagement.BlockManager: defaultReplication         = 1
14/10/24 10:35:29 INFO blockmanagement.BlockManager: maxReplication             = 512
14/10/24 10:35:29 INFO blockmanagement.BlockManager: minReplication             = 1
14/10/24 10:35:29 INFO blockmanagement.BlockManager: maxReplicationStreams      = 2
14/10/24 10:35:29 INFO blockmanagement.BlockManager: shouldCheckForEnoughRacks  = false
14/10/24 10:35:29 INFO blockmanagement.BlockManager: replicationRecheckInterval = 3000
14/10/24 10:35:29 INFO blockmanagement.BlockManager: encryptDataTransfer        = false
14/10/24 10:35:29 INFO namenode.FSNamesystem: fsOwner             = hduser (auth:SIMPLE)
14/10/24 10:35:29 INFO namenode.FSNamesystem: supergroup          = supergroup
14/10/24 10:35:29 INFO namenode.FSNamesystem: isPermissionEnabled = true
14/10/24 10:35:29 INFO namenode.FSNamesystem: HA Enabled: false
14/10/24 10:35:29 INFO namenode.FSNamesystem: Append Enabled: true
14/10/24 10:35:30 INFO util.GSet: Computing capacity for map INodeMap
14/10/24 10:35:30 INFO util.GSet: VM type       = 64-bit
14/10/24 10:35:30 INFO util.GSet: 1.0% max memory = 889 MB
14/10/24 10:35:30 INFO util.GSet: capacity      = 2^20 = 1048576 entries
14/10/24 10:35:30 INFO namenode.NameNode: Caching file names occuring more than 10 times
14/10/24 10:35:30 INFO namenode.FSNamesystem: dfs.namenode.safemode.threshold-pct = 0.9990000128746033
14/10/24 10:35:30 INFO namenode.FSNamesystem: dfs.namenode.safemode.min.datanodes = 0
14/10/24 10:35:30 INFO namenode.FSNamesystem: dfs.namenode.safemode.extension     = 30000
14/10/24 10:35:30 INFO namenode.FSNamesystem: Retry cache on namenode is enabled
14/10/24 10:35:30 INFO namenode.FSNamesystem: Retry cache will use 0.03 of total heap and retry cache entry expiry time is 600000 millis
14/10/24 10:35:30 INFO util.GSet: Computing capacity for map Namenode Retry Cache
14/10/24 10:35:30 INFO util.GSet: VM type       = 64-bit
14/10/24 10:35:30 INFO util.GSet: 0.029999999329447746% max memory = 889 MB
14/10/24 10:35:30 INFO util.GSet: capacity      = 2^15 = 32768 entries
Re-format filesystem in Storage Directory /usr/local/hadoop/yarn_data/hdfs/namenode ? (Y or N) Y
14/10/24 10:35:40 INFO common.Storage: Storage directory /usr/local/hadoop/yarn_data/hdfs/namenode has been successfully formatted.
14/10/24 10:35:40 INFO namenode.FSImage: Saving image file /usr/local/hadoop/yarn_data/hdfs/namenode/current/fsimage.ckpt_0000000000000000000 using no compression
14/10/24 10:35:40 INFO namenode.FSImage: Image file /usr/local/hadoop/yarn_data/hdfs/namenode/current/fsimage.ckpt_0000000000000000000 of size 198 bytes saved in 0 seconds.
14/10/24 10:35:40 INFO namenode.NNStorageRetentionManager: Going to retain 1 images with txid >= 0
14/10/24 10:35:40 INFO util.ExitUtil: Exiting with status 0
14/10/24 10:35:40 INFO namenode.NameNode: SHUTDOWN_MSG: 
/************************************************************
SHUTDOWN_MSG: Shutting down NameNode at pumudus-MacBook-Pro.local/10.100.x.xxx
************************************************************/


Starting Hadoop file system and yarn


It's good practice to start each process one after another as it will be easy to debug if something goes wrong.

Start the namenode
hadoop-daemon.sh start namenode

Use jps tool to see if namenode process started successfully.
pumudus-MacBook-Pro:sbin hduser$ jps
33907 Jps
33880 NameNode

Start datanode
hadoop-daemon.sh start datanode

Start node manager 
yarn-daemon.sh start nodemanager


Start history server
mr-jobhistory-daemon.sh start historyserver

If everything went correctly, you will see all the VMs started in jps as follows.
pumudus-MacBook-Pro:sbin hduser$ ./hadoop-daemon.sh start datanode
starting datanode, logging to /hadoop/hadoop-2.2.0/logs/hadoop-hduser-datanode-pumudus-MacBook-Pro.local.out
pumudus-MacBook-Pro:sbin hduser$ jps
33965 DataNode
34001 Jps
33880 NameNode
pumudus-MacBook-Pro:sbin hduser$ ./yarn-daemon.sh start nodemanager
starting nodemanager, logging to /hadoop/hadoop-2.2.0/logs/yarn-hduser-nodemanager-pumudus-MacBook-Pro.local.out
pumudus-MacBook-Pro:sbin hduser$ jps
34066 Jps
33965 DataNode
34035 NodeManager
33880 NameNode
pumudus-MacBook-Pro:sbin hduser$ ./mr-jobhistory-daemon.sh start historyserver
starting historyserver, logging to /hadoop/hadoop-2.2.0/logs/mapred-hduser-historyserver-pumudus-MacBook-Pro.local.out
pumudus-MacBook-Pro:sbin hduser$ jps
34096 JobHistoryServer
33965 DataNode
34035 NodeManager
33880 NameNode
34120 Jps


Troubleshooting  for Mac OS X :

If you facing issues in mac os x add following lines to hadoop-env.sh as well.

1. "Unable to load realm info from SCDynamicStore put: .." when starting a namenode.
       This is a known issue of hadoop. There's a open jira for this issue as well.
       https://issues.apache.org/jira/browse/HADOOP-7489
export HADOOP_OPTS="${HADOOP_OPTS} -Djava.security.krb5.realm= -Djava.security.krb5.kdc="
export HADOOP_OPTS="${HADOOP_OPTS} -Djava.security.krb5.conf=/dev/null"

2.  "Can't connect to window server - not enough permissions." When formatting a name node.
       This is a java error specific to Mac os x. Add following lines and use Headless mode in hadoop.
       Refer http://www.oracle.com/technetwork/articles/javase/headless-136834.html for more information.
export HADOOP_OPTS="${HADOOP_OPTS} -Djava.awt.headless=true"

3. If you unable to start any process refer the logs generated by hadoop in log directory. These logs are very descriptive therefore logs will be helpful to pin point issues.


Hadoop Web Interfaces


Hadoop comes with web interfaces which shows current statuses of hdfs and map reduced tasks.

   1. See the status of HDFS name node. http://localhost:50070

      
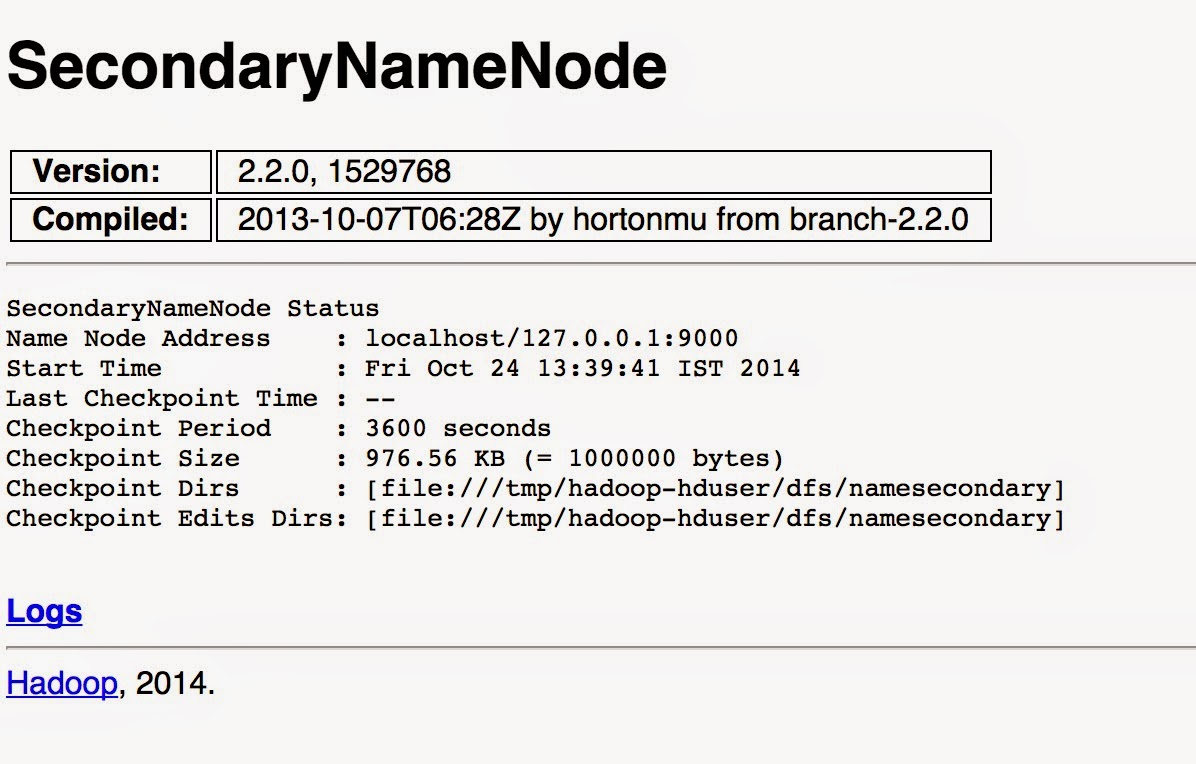
   2. See the status of HDFS secondary name node. http://localhost:50090
      

   3. See hadoop job history http://localhost:19888/


If you can access these web interfaces that means hadoop has configured correctly on you machine with a single node. If there's any questions feel free to ask on comments bellow.


Good luck..!!